Posts tagged ‘English Language Learners’

Yodio

A year or so ago Michelle blogged about alternatives to gcast. One of the websites that she mentioned was yodio.com/. Since then, I have had the opportunity to work with the site a little bit. It is an easy, quick, and free way to create slideshows that include not only your pictures, but your voice. It combines podcasting and digital photography.

I have had teachers make a yodio of their autistic students that was used to provide information about that student to staff members. Another teacher is using yodio to showcase her student’s alliteration book. After each child creates their image and sentence, they are recording themselves reading their page. Yet another teacher has used yodio as a way for students to narrate how to solve a math problem. This example is available below:

Teachers can use yodio as a way to track student’s ability to read a piece of text – another fluency check. It can be a great way to showcase a students development not only for yourself, but for students and parents.

A note: if you add your phone number from school and that number doesn’t show up on a caller I.D., then it won’t automatically tie into your account. There is a way to add a password when you use that number so that you can access that podcast on your account.

For ease of use, this is a great way for students to begin creating personalized products.

Dvolver Movies

It has been many, many months since I have last posted, but I decided that I really wanted to post at least one thing over break. I decided to focus on dvolver.com/.

This site allows anyone to create a three scene movie with up to two characters in each scene. Students can choose the setting, the background, the characters (and their dialog), the music, their title, and the title theme. It is a great way to allow students to begin working with these concepts in a more sophisticated way. I have had my students create movies explaining an important historical event, a process, and a “how to” video. They were able to select their topics based upon those three criteria. You could have students create a video on virtually anything. Some ideas would include: how to solve a math problem, a biography of a historical figure (or themselves), how to care for an animal or pet, how to play a game, and why something is important.

Since my students weren’t setting up an account, they had to create their video in one class sitting. I therefore created a graphic organizer where they selected their scene, background, character, and music selections ahead of time. I also have a place for them to write out their dialog. I found that if I just had them try to create it on the fly, they really struggled with not only finishing it within the class period, but also creating a quality product.

Just a small warning before you have your students create their own movies – preview the entire process first. There are several scenes and characters that would not be appropriate for students to use. I do not include those options in the graphic organizer that I created. When I am previewing the site with them, I show them all of the characters and scenes, but quickly point out those that are not O.K. for them to use. I have had no problems with them using inappropriate characters or scenes.

The great thing about dvlover is that you can embed the movies. I have my students embed theirs on their personal page on the class wiki. Click here to view some examples of my students’ movies.

Since I teach in a K-8 school, I can have my students create movies that can be used to instruct younger students or to extend their knowledge. I try hard to have a purpose beyond just completing the assignment for them to consider.

Below is a Jing screencast that I created to explain how to create a dvolver.com/ movie.

Dvolver

This screencast explains how to embed your dvolver movie onto a wikispaces page.

Embedding Dvolver

This is the graphic organizer that I created for my class: dvolver storyboard-1

I have found dvolver to be a great way for my students to create a visual representation of their knowledge.

Fluency

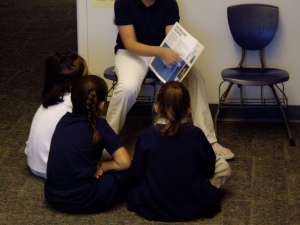
During this summer, I really started thinking about my students’ fluency. As a teacher of LEP and FEP students, increasing their fluency is an important part of moving them toward grade level comprehension. As I always do, I wanted to make the practice of fluency as real world as possible. Luckily, I work in a K-8 building and had developed a relationship with one of the 1st grade teachers. While it probably should have occurred to me earlier, it finally dawned on me that my students could prepare a short book and read it to his class.

After discussing it with the 1st grade teacher and ironing out some details, it looked like it was going to happen. I had decided to piggy back on the concepts and content that he was teaching in class to help us determine which books to read. For example, when his class studied family relationships, my students checked out picture books on that subject to read. This was another way that this project could help build some background knowledge and experiences for his students. In this manner, both groups of kids would benefit. For some topics, my students selected from nonfiction texts, especially when it came to science topics. I feel that it is important for my students to learn how to read both fiction and nonfiction as they require different tones and expressions.

After our first trip, I decided to step things up a notch, and talked to my students about engaging the 1st graders that they were reading to. We talked about asking questions (both comprehension and connecting questions) as we read the book. In this way, the 1st graders would be even more engaged. It also provided a challenge for my students to come up with interesting, relevant questions for the group that they were reading to.

Since my purpose was to focus on fluency, I have videotaped each student read for about 20 seconds each time we visit the 1st grade class. I can then create a video of their clips and track their progress over time. It also allows me to assess how they are reading fiction vs. nonfiction texts.

I must say, my students have really enjoyed this experience. They are becoming more and more proficient and one of the benefits is their progress with not only reading out loud, but the level that they must understand the book and its concepts before they read to the 1st graders. While it is helping the 1st graders build their background knowledge, it is also doing the same for my students.

During the course of the week, my students select a book to read, practice reading it out loud to themselves, practice reading it out loud to their classmates, read it to me, and write down some questions that they can ask. In this manner, by the time we visit the 1st graders, most are proficient at reading their books.

I must say that this project has turned out better than I had hoped. It is an experience that my students look forward to. They do not complain about practicing because they know that a real audience awaits them. At this point, they know that the 1st graders will lose interest really quickly if they don’t perform well, so they always strive to keep it engaging. The first graders love it as well, stopping me during lunch to ask when my class will be visiting them.
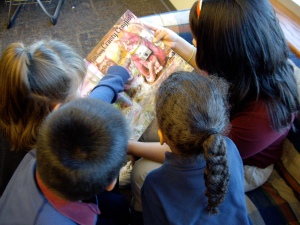
Middle school student reading "Anamalia" to 1st graders.

Reading a nonfiction text to 1st graders.

Amazon Book Review – 1st Post

After my classes created a book review rubric, it was really important to begin writing their first review. One of my criteria was that they must finish a book before they review it.  While that might not always be necessary, a lot of my students struggle to really describe why they aren’t liking a book.  I get a lot of “It’s boring.”  I am working to try and get them to really understand why they don’t like it, but they aren’t all totally there yet, but that is another problem.

They had to use the rubric to write their rough draft.  We talked about what elements they should include in the review and in what order.  Descriptive words, we decided, needed to be added after the rough draft was completed.  It was a polishing area as opposed to a component of the review.  After they finished their rough draft, they edited it for content and word choice.  I then edited it once more.  I had my students write out the review because they are not able to draft on the computer and polish their writing in the 20 minutes that I have in the computer lab.  There is also no way to save the review to complete at a different time.  

After they had created the review and edited it, we headed into the computer lab.  In order to post on Amazon, you must have a customer account.  Additionally, you must purchase something on the account.  If you purchase a book, you can then delete the payment information and still use the account to post reviews.  I had created screen shots to help students log in.  It is quite a process to login to the account, so there were many steps that they needed to follow.  You can see the login sheets here:  Logging in to Amazon.  

I was very glad that I had the screen shots for my students to use and that they had written their reviews ahead of time.  It took them the full 20 minutes (at least) to get the review entered and edited before publishing.  They were very excited about publishing it to the internet – I was as well.

We posted our first reviews in December and have since posted one more round.  They were able to access the account much faster which meant that they had time to edit their typos.  I am now having them post one review a month.

Note:  You might check your Amazon profile to make sure that is shows the reviews you have posted (or find your review under the book’s information).  I have run into a problem with my account.  None of my reviews had posted after my first test.  I have contacted customer service, but the problem hasn’t been totally fixed yet.  You might not have any issues with this, but it is something to keep an eye on.

2nd Note: 4/1/09 – I figured out the posting issue. When your students enter their review, have them select that they are over 13. This will allow the book review to be posted. This was not a privacy issue as the account they were posting under was Mrs. Duarte’s class, so their names don’t appear anywhere. I have also discovered that if one person writes a book review on The 13th Reality, no one else can post a review on it. That means that each student will have to create a review on a different book. This might be a problem depending on how many students you teach, then again, you can always create multiple accounts.

Amazon Book Reviews – Rubric Creation

Before my students started writing their own book reviews, I wanted to make sure that they knew the target that they needed to aim for – that is what I call a rubric.  We used the same four sections from the book review highlight activity:  who should read this book?, descriptive words, plot, and opinions.  We added three optional categories:  characters, genre, and rating.  After we had each of the topics that they needed to include, we started filling out a rubric together on the overhead.  Since we had created a booktalk rubric together earlier in the year and they had been assessed on the rubric, they were familiar with the possible scores they could receive in each area:  advanced, proficient, partially proficient, unsatisfactory, or no attempt.  We usually fill out the advanced first, then work our way down the scale.  We listen to everyone’s ideas and come to a consensus.  After we create the rough draft, I type up the information, create an overhead and have my classes review the information.  I want to make sure that they agree to everything on the rubric, because that is what they are going to be required to do.

Each of the rubrics look a little different, based on the decisions of each class.  Here is an example that my class came up with:

book-review-rubric1

So, after the creation of the rubric, it was time for them to write their own book review…to be continued.

Slideboom

Slideboom.com is a place where you can host your PowerPoint presentations or search for presentation that have been uploaded by other users. The website is very easy to use and quickly uploads presentations. Slideboom is a great tool for sharing your presentations with other educators and students. Also, if you create a presentation at home or at school, just upload it to slideboom and you can access it from any location. I hope you find slideboom.com as easy to use and useful as we have. If you would like to look at the presentations we have uploaded, you can find them at slideboom.com/people/ellclassroom. Feel free and please download them and modify the presentations to meet the needs of your students.

ELLclassroom's presentations

LàTeen Magazine

 Today, while I was viewing the exhibits at the NMSA conference, I came across a very interesting magazine. The magazine is specifically for Latino teens and is appropriately named LàTeen. LàTeen was originally created by a class of 8th graders and their teacher. At this time, I do not know all of the details as to how the magazine became what it is today. There is a website to accompany LàTeen, but it is still under construction. However, you can visit www.lateen.com and register your school or classroom for a free 6-month subscription (must have tax id). Teens or Youth can also register for an individual free 6-month subscription.


LàTeen Magazine contains articles in Spanish and English (the same article is not featured in both languages). The articles are about fashion, sports, famous Latinos, and much more. I look forward to receiving my first copy to read through and report back on some ways to incorporate this magazine into the classroom. If you or your students have already had the opportunity to read LàTeen Magazine, please share with us your thoughts

NMSA 35th Annual Conference- Denver, CO

We are off to the National Middle School Association’s 35th Annual Conference in Denver. How exciting!! The last time I went to the NMSA conference was in 2001 as a college senior. Having been in the classroom now, I am looking forward to all of the great things that will be presented such as technology, strategies, methods, resources, and freebies from the exhibit hall of course. 

Tomorrow afternoon, Jennifer and I will be presenting in one of the concurrent sessions. The title for our session is Strategies, Methods, and Resources for Increasing ELL Student Understanding and Performance. Some of the things we will cover during the 75 minute session are Who are English language learners?, Characteristics?, Structure- discipline, classroom procedures, graphic organizers, Academic vs. Content Vocabulary, Foldables, and Example of a modified lesson. Believe me, we have tons more that we could talk about but this was all that we could fit into the time. If you would like a copy of our handouts, visit our wiki (some pages are still a work in progress) at http://ellclassroom.wikispaces.com/NMSAhandouts

I look forward to reporting back on all that I learn over the next few days!

Classroom Management & Discipline Part 2

Below is the continuation of our Classroom management & discipline series.

Classroom Management & Discipline Part 1

Classroom management and discipline are an essential element of the English language learner classroom. Below is part 1 of 2 Classroom Management & Discipline.