Posts from the ‘Resources’ Category

Yodio

A year or so ago Michelle blogged about alternatives to gcast. One of the websites that she mentioned was yodio.com/. Since then, I have had the opportunity to work with the site a little bit. It is an easy, quick, and free way to create slideshows that include not only your pictures, but your voice. It combines podcasting and digital photography.

I have had teachers make a yodio of their autistic students that was used to provide information about that student to staff members. Another teacher is using yodio to showcase her student’s alliteration book. After each child creates their image and sentence, they are recording themselves reading their page. Yet another teacher has used yodio as a way for students to narrate how to solve a math problem. This example is available below:

Teachers can use yodio as a way to track student’s ability to read a piece of text – another fluency check. It can be a great way to showcase a students development not only for yourself, but for students and parents.

A note: if you add your phone number from school and that number doesn’t show up on a caller I.D., then it won’t automatically tie into your account. There is a way to add a password when you use that number so that you can access that podcast on your account.

For ease of use, this is a great way for students to begin creating personalized products.

Dvolver Movies

It has been many, many months since I have last posted, but I decided that I really wanted to post at least one thing over break. I decided to focus on dvolver.com/.

This site allows anyone to create a three scene movie with up to two characters in each scene. Students can choose the setting, the background, the characters (and their dialog), the music, their title, and the title theme. It is a great way to allow students to begin working with these concepts in a more sophisticated way. I have had my students create movies explaining an important historical event, a process, and a “how to” video. They were able to select their topics based upon those three criteria. You could have students create a video on virtually anything. Some ideas would include: how to solve a math problem, a biography of a historical figure (or themselves), how to care for an animal or pet, how to play a game, and why something is important.

Since my students weren’t setting up an account, they had to create their video in one class sitting. I therefore created a graphic organizer where they selected their scene, background, character, and music selections ahead of time. I also have a place for them to write out their dialog. I found that if I just had them try to create it on the fly, they really struggled with not only finishing it within the class period, but also creating a quality product.

Just a small warning before you have your students create their own movies – preview the entire process first. There are several scenes and characters that would not be appropriate for students to use. I do not include those options in the graphic organizer that I created. When I am previewing the site with them, I show them all of the characters and scenes, but quickly point out those that are not O.K. for them to use. I have had no problems with them using inappropriate characters or scenes.

The great thing about dvlover is that you can embed the movies. I have my students embed theirs on their personal page on the class wiki. Click here to view some examples of my students’ movies.

Since I teach in a K-8 school, I can have my students create movies that can be used to instruct younger students or to extend their knowledge. I try hard to have a purpose beyond just completing the assignment for them to consider.

Below is a Jing screencast that I created to explain how to create a dvolver.com/ movie.

Dvolver

This screencast explains how to embed your dvolver movie onto a wikispaces page.

Embedding Dvolver

This is the graphic organizer that I created for my class: dvolver storyboard-1

I have found dvolver to be a great way for my students to create a visual representation of their knowledge.

Ning.com

In December, a colleague of mine, Kevin Byers, told me about a site that he was using with his students – Ning.com/. I was curious about the site and decided, after talking to him about it for a while, to try it with my students. Over winter break, I created my classroom Ning. I decided that I would keep the site closed so that I wouldn’t have to worry about it being open to everyone. My students had to access the site by invitation only through e-mail, so I decided that I would use their ePal accounts. After returning to school, I got permission from my principal and was ready to begin the process.

I first had to teach my students about social sites (which Ning is), how to communicate on them, how to navigate to the site, selecting an avatar, and the list goes on. My students loved it immediately. It was something that they were interested in doing not only every day at school, but also at home. After I had buy-in, I knew that I must keep the purpose of the site academically related.

We started by having discussions in the forum section about the books that they were reading. Invitations to join the site were extended to all of my students, but also to administrators and other teachers that were interested in posting information. This became a place where all of my students could communicate.

From there, I moved to embedding videos on the site. The first round of videos were based on what my students were studying in social studies class. For one group, a video on ancient Greece, for another, an archaeological dig, and for the last group, Chinese immigration. After watching the video, there was a question and they needed to respond to it. They could also respond to someone else’s comment. I found that this was an engaging way to bring content into my classroom so that I could support building background knowledge.

While gcast.com/ was free, I was able to embed podcasts that my students had given over various books so that others could listen to it.

Moving into next year, I plan on teaching my students about blogging (as there is a blog feature). I think that this can be a great way to lead into a more technical writing, especially if they begin quoting other sources (which I would like for them to do).

If you decide to start your own Ning (which means “peace” in Chinese, by the way), there are several things to keep in mind.

1. Decide if you want your site to be open or closed. As the creator of the site, you have network creator privileges and select the level of security that you want.

2. You can also decide what types of features that you want on the site (videos, blogs, groups, forums, music, events, etc).

3. You can decide the level of control over what information is posted. For some features, you can establish a requirement that the network creator must approve posts.

4. Each member of the Ning has their own page. As network creator, you can decide if they can change the colors on that page (this was something that I did allow).

5. Since my Ning was for academic purposes, I knew each student’s login information. This was not only a safeguard feature, but also one of practicality. I can’t tell you how many forgot their login information.

6. The content of the Ning is really up to you, the creator and to your members. The sky is the limit!

Alternatives to Gcast

With the unfortunate new price that it costs to use Gcast.com, Jennifer and I have been searching the Internet for alternatives that are free to use. Luckily, we have found two that we like. For those of you unfamiliar with Gcast, it is an online podcast host that allows its users to call in by phone and record a podcast. The podcast is saved to the users account to be edited later if needed or published. Jennifer had been using Gcast with her students to record their book talks. She was going to expand her use of Gcast to her professional development co-teaching class so that the members of the class could record their co-planning session. In search of an alternative solution, we posted a tweet asking for suggestions of similar sites to Gcast. In return, we were referred to phonecasting.com and drop.io.

Here is what we have found to be and not to be useful…

Phonecasting.com seems to offer promise because it allows users to record and publish podcasts through various methods such as uploading your podcast from your computer or calling and recording a podcast from your phone. It is free to use and the number you call to record the podcast is toll free. The later was a huge feature that we considered essential for two reasons: 1) we cannot expect our students to call a long distance number from their home phone and they may not have a cell phone 2) teachers cannot call long distance from the school and to record a co-planning session would possibly use excess minutes on their cell phones. However, Jennifer and I were both unsuccessful at setting up a channel (the location where the podcasts would be stored or featured). Even after referencing the “how to” directions many times, we still could not figure out how to completely set up the account and channel. It was very frustrating and we can normally figure out these types of things (at least together). Needless to say, we will not be using phonecasting.com.

I liked Drop.io almost immediately. Drop.io is much like an online file folder for sharing files. It allows you to upload media, documents, podcasts, pretty much anything you can imagine. It even allowed me to upload a .m4v file that I created and then exported from iMovie. You can “drop” a file by uploading it directly to your drop.io folder, emailing it, or calling and recording a voicemail. Drop.io also provides a number to call if you wish to host a conference call. Drop.io was very easy to set up and use. When I performed a “test” call, I was surprised how quickly the .mp3 file appeared in the drop. The only set back that we foresaw was the long distance telephone number for the voicemail.

Yodio.com allows users to record, create, and share pictures, presentations, etc. Yodio users upload pictures or a presentation and add narration from their computer or by phone. The number users call to record their Yodio is toll free. However, the number the user calls from must be registered with the account being called. Yodio was also very easy to set up and use. One thing that we like about Yodio is the visual component it offers.

We would love to hear of any sites that you use for podcasting or how you use podcasting in your classroom.

Dr. Bob Marzano, CUE 2009 Keynote, Part 2

This is the second and final part of Dr. Marzano’s speech. It is primarily about assessment.

Vodpod videos no longer available.

Dr. Bob Marzano, CUE 2009 Keynote, Part I

Dr. Marzano spoke at the CUE (Computer Using Teachers) Conference in March 2009. This is the first part of his keynote. I believe that it shows very practical implications for schools and school districts around the country.

Vodpod videos no longer available.

more about “Dr. Bob Marzano, CUE 2009 Keynote, Pa…“, posted with vodpod

Online Resources

I wanted to share a blog that I follow. Larry Ferlazzo’s Websites of the Day… http://larryferlazzo.edublogs.org/. I like that Larry posts multiple websites relevant to current events, holidays, celebrations, and other miscellaneous and useful websites. These websites facilitate planning, provide background information, are educational in nature, or just resourceful when navigating the web. Because Mr. Ferlazzo teaches English language learners he always evaluates the sites that he references according to useability by ELLs.

I would like to know what blogs or websites you find helpful and informative.

Interactive News Websites

A couple of weeks ago my cousin passed away, and I traveled to Georgia to be with my family for the funeral. My cousin’s death was published in the local and state news papers and online. I was previously aware of the interactive side of news (being able to comment on an article) but had never commented on any articles or been on the receiving end of those comments. People who new my cousin or our family left notes of sympathy, love, and encouragement after the obituary. I thought this was a wonderful use of the interactive web. However, there were also comments left from readers of the news story (separate from the obituary). Some of the comments and opinions left were uncensored as far as how they may impact and affect the family of the deceased. I saw this as the less attractive side of the interactive web. 

Since then, I have been pondering how to blog about my new experience with the interactive web and what I learned from it. First, I think the ability to comment on the news can be thought provoking and beneficial. The comments of sympathy, love, and encouragement were overwhelming and brought joy and warmth to our family. However, I don’t think that it is a place where the random reader should write whatever they want just because they can. Maybe this falls under web etiquette.  

So, why did I blog about this and what does it have to do with English language learners? I think that this is another form of authentic writing that can be used with our students. Standard 2 of the American Association of School Librarians (AASL) standards for the 21st-Century Learner states that “Learners use skills, resources, and tools to draw conclusions, make informed decisions, apply knowledge to new situations, and create new knowledge.” As members of a democratic society, it is essential that our students know how to think critically and make informed decisions. It is also important to teach them how to participate ethnically and productively (AASL standard 3). The interactive news websites can be a tool we use to facilitate the teaching of these skills.

Holiday Letter


As part of my continuing attempt to create authentic writing experiences for my students, I had my students write a holiday letter and mail it to a person of their choice.  There were many benefits and lessons to be learned here – friendly-letter format, summarization (milestones of their year), what a full address is, addressing an envelope, and the purpose of a holiday letter.

Here is what I discovered.  Even though my students are in middle school, most of them don’t know what constitutes a full address, they don’t know how to address an envelope, they have difficulties coming up with things to write about, and they were completely amazed that I was going to mail their letters.

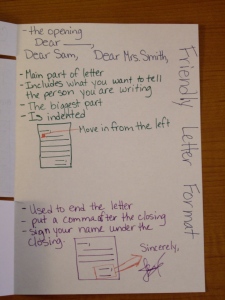
We started by creating a foldable for friendly letters.  They needed to know the format before they could write an appropriate letter.  I created a powerpoint that broke the letter into three parts.  You can view and download the powerpoint here:  http://www.slideboom.com/presentations/36868/Friendly-Letter

This is what their foldable looked like:


Outside of foldable

Outside of foldable

Inside the foldable

Inside the foldable


We stapled these into their spirals so that they could reference them, both for the holiday letter and their epals e-mails.

After they made their foldable, we started talking specifically about holiday letters and their purpose.  I brought several examples for them to peruse.  I prepared a powerpoint that shared topics, mood, and overall purpose for the letter.  This seemed to help several of my students decide on topics and the type of letter that they wanted to write.  You can view and download the powerpoint here:  http://www.slideboom.com/presentations/36907/Holiday-Letter

They finally started writing their letters.  I created a basic letter format that they would copy their final draft onto.  It had some generic pictures and text boxes on it.  It wasn’t that big, so they didn’t have to write a lot of information.  This was actually a good thing, because some of them really struggled with things to write about.

Here is what I would change next time:  I would give them more time to work on the project.  Some students struggled getting all of their information written, edited, and their envelop addressed.  I also need to work further on editing skills.  It is something that they are not proficient at.  I do feel, however, that this was a very worthwhile project and will probably expand it a little and repeat it next year.

Language Arts Stations

I have been working with a teacher who has an 8th grade Language Arts class that has quite a few ELL and SPED students.  She is struggling to find a way to meet the diverse needs in the class, work with students in small groups, and maintain classroom management.  I talked to this teacher about coming in and co-teaching with her.

I met with the teacher to plan out the lesson and decide what she wanted the focus to be.  She has been working on determining the subject and predicate in sentences and is moving into the different types of sentences.  She also wanted to be able to meet with a small group of kids.  We decided to set up stations.  She would create groups based on some classroom data.  That way when a group came to her, she would be able work on specific skills that that group was missing.  The four stations that we decided on were:  teacher station, creating sentences finding the subject and predicate, types of sentences foldable, and a parts of speech bingo.  I would create the foldable, provide the game, and an introduction to types of sentences.  She would create the stations, the subject and predicate station, and her teacher station materials.

Before class began, we arranged the desks in the class and put the materials at the appropriate stations.  When the students came in, we told them the station that they needed to sit at.  We did this because we knew that this group would struggle with movement after the instructions.  We started the lesson with an introduction to types of sentences.  I created a powerpoint (you can view or download it at this address: http://www.slideboom.com/presentations/32470/Types-of-Sentences ). to introduce the topic and explain the foldable.

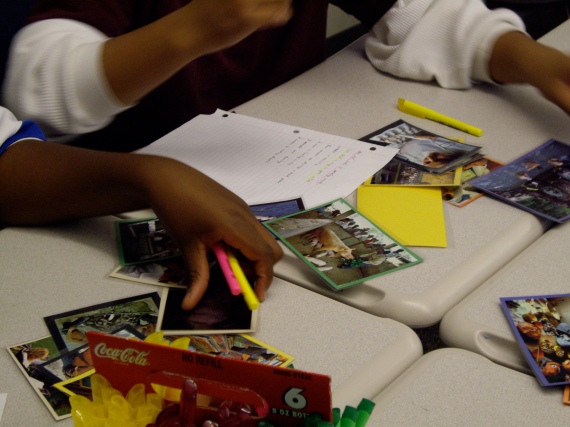
After the introduction, we explained the task at each station.  At the subject/predicate station, students had to write one sentence based on a picture and then highlight the subject and predicate in each sentence. This sheet would be used as a pre-assessment for the teacher at her station (the one right after the subject/predicate station).


Subject/Predicate Station

Subject/Predicate Station

We got some good data from this station.  One entire group neglected to add a subject to any sentence.  This allowed the teacher to know exactly where she needed to begin her instruction – even further back than she had anticipated.  

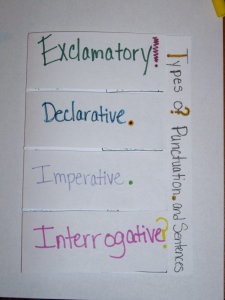
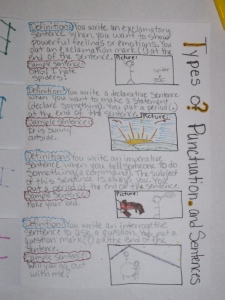
At the foldable station,  students made a hotdog fold and cut out four sections.  Each section would be used to describe one of the types of sentences.  They would write a definition, a sample sentence, and a picture illustrating that picture.  They will use this foldable as a study guide for future assignments.


Types of Sentence Foldable

Types of Sentence Foldable

Inside of foldable.

Inside of foldable.


With our short classes (only 45 minutes), we ran out of time very quickly.  Students did not get to finish the foldable.  We decided to create an overhead and have them finish it as a warm-up.  We would provide the definition and they would add the sample question and picture.  This would provide a quick assessment for the teacher to see if they comprehended the various types at a very simple level.


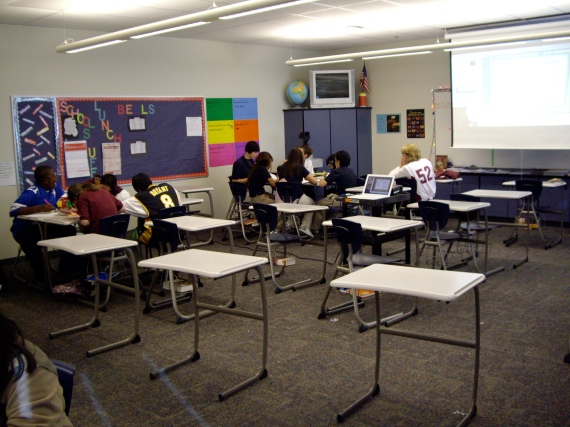
Students working in stations.

Students working in stations.


At our debriefing, we talked about how great a job the students did, how surprised she was that a group of students didn’t add subjects to any of their sentences, how she adjusted her instruction to that, the fact that students were upset when they couldn’t finish their foldable (how many students do you know who complain when they can’t finish their work?!?), and how to build in the time to finish the foldable during a later class.

All in all, the kids did a great job.  I think that this might be a strategy that will be successful with this class.  

On a different note, the more foldables that I make, the more excited I am about this strategy and using it with students.